 If you keep your orchids outdoors during the summer to take advantage of the rainy season and warm weather, be careful that your plants aren’t receiving too much of a good thing. Orchids are natural epiphytes that derive water and nutrients from tree canopies. Their native settings allow plants to soak up just the right amount of rain, shed unnecessary water and allow roots to dry out between rain showers. Despite our attempts to mimic an orchid’s natural setting, an outdoor potted orchid needs extra care and attention to avoid receiving too much water.
Orchid Varieties
All orchids are not the same. Some varieties prefer to dry out completely between waterings such as vandas and phalenopsis (moth orchids). Other orchids such as paphiopedliums (lady slippers), miltonias (pansy orchids) and cymbidiums like to stay evenly moist but not soggy. Orchids that like something in the middle - evenly moist during high growth periods but dry outs between waterings - include cattleyas, dendrobiums and oncidiums. What Is the Harm in Too Much Water? There is such as thing as “too much of a good thing” as it relates to rainwater and your outdoor orchids. Without proper drainage, too much water can literally kill your plant. Overwatering can deprive your orchid roots of oxygen. In a short period of time, your healthy green or brown roots will turn black and begin to rot. This wet environment is ideal environment for bacteria or fungus. If you aren’t careful, the damage caused to your roots will eventually show in the leaves of your plants. By then, unfortunately, it may be too late to save the plant. So take the time this summer to routinely check your outdoor orchids to be sure they aren’t getting too much of a good thing with these summer rains. Orchids provide the perfect environment for pests to live and thrive. Warm, humid air; plump, soft leaves; tender buds and blossoms; and plenty of crevices to hide under leaves and in potting media. If you aren't careful, a small bug infestation can quickly grow into a big and costly problem. Below are some photos and descriptions to help you identify what may be harming your plants as well some suggestions on how to get rid of pesky pests. 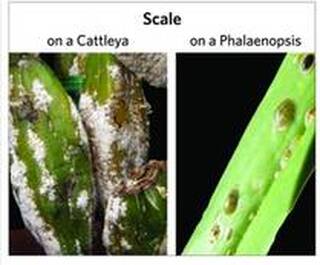 Scale Scale are piercing, sucking insects that are difficult to control as the reproducing females are covered by a protective shell that also protects the pest's eggs. Scale is often resistant to many pesticides due to their hard outer shell.  Aphids Aphids are small, soft-bodied insects that are generally pear-shaped and green or black in color. They reproduce rapidly and are most often seen on flower buds/spikes and new growth. They produce a sticky substance referred to as honeydew which can encourage the growth of a black fungus (sooty mold). If the leaves of your plants exhibit sooty mold, it's likely that you have an aphid infestation. 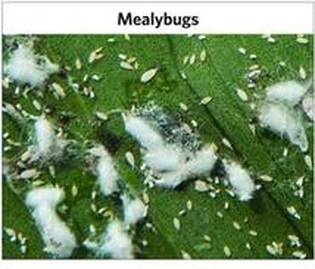 Mealybugs Sometimes confused with scale, mealybugs are a soft-bodied insect that are readily identified at the mature stage as white to greyish-white and cotton-like. They are often found in the same areas as scale and can do substantial damage if not dealt with immediately. Removal of Scale, Aphids and Mealybugs: Use a small toothbrush or cotton swab soaked in rubbing alcohol (known as isopropyl alcohol) to remove the pests. Do not use other forms of alcohol as they may damage your plants. Be sure to get into the crevices of the leaves as bugs tend to hide there. This treatment is a tedious process and must be repeated often. However, if you catch and treat the infestation early, it will save your plants.  Thrips These are very small, elongated insects that are most prevalent on flowers and buds. Often times, their presence is not recognized until the damage from their feeding is obvious. These bugs suck the juice right out of your plants which can cause the deformation of buds, flowers, and new growth. You may also notice browning around the edges of your flowers. Removal To get rid of thrips, you will need to use a pesticide. Your plants should be inspected weekly, and the pesticide should be reapplied until the infestation has disappeared completely. 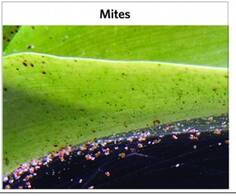 Mites Mites are microscopic arthropods that are related to ticks. They attack the undersides of leaves. Their presence is often unnoticed until it's too late. They leave behind silvery, pitted, unsightly leaves. Removal It is important to note that mites are not insects. Most insecticides are not effective at killing mites. You must purchase a pesticide that is specifically labeled as a miticide for use against this pest. For small infestations in the home, wiping the infested areas with a cotton ball dipped in rubbing alcohol can also be effective.  Grasshoppers
, especially Lubbers, can do significant damage to orchids in a very short period of time. Lubbers are usually 1” to 3” long and can vary in color from yellow to black depending on the species and stage of growth. Removal These are best controlled immediately by hand or pruners.  Phal. KV Charmer "KV5702" Phal. KV Charmer "KV5702" As orchid growers, we are often asked the question, “My orchid seems to be growing well and it looks healthy, but I have not been able to get it to bloom again. Why is this?” The answer is often a simple modification to the amount of light and/or a change in temperature to kick start a blooming cycle. Not all orchids have the same cultural requirements, so it is important to first identify the type of orchid you have – this is essential! 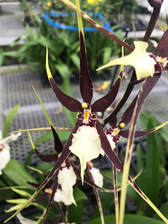 Mtssa. Kauai's Choice 'Tropical Fragrance' AM/AOS Mtssa. Kauai's Choice 'Tropical Fragrance' AM/AOS Refer to these web pages for care guidance for your specific type of orchid: Cattleya, Dendrobium, Oncidium, Paphiopedilum, Phalaenopsis, and Vanda. Here you will find light, temperature, humidity and feeding guidance. In addition to making slight modifications to your orchids environment, it's important to note that all orchid growers need patience. Most orchids bloom seasonally or just annually. This is because there are certain temperature and/or light changes that occur during the year that trigger flowering. Plants need specific amounts of light each day to be able to convert food (fertilizer) and water into energy. This energy is then used to power the processes required for the plant to grow and bloom. 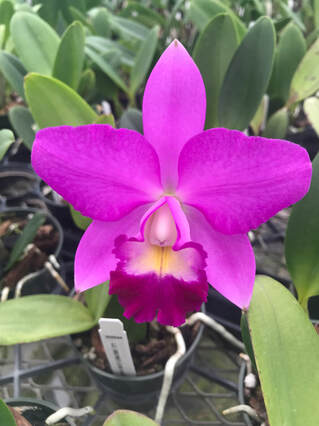 Cattleya Secret Love Angel Cattleya Secret Love Angel Light If your plant is receiving adequate water and food (the plant looks lush and healthy, leaves are a nice dark green) but does not flower or only produces a few flowers, then chances are it is not getting enough light. You should try to gradually increase the amount of light your plant is receiving (leaves should be a medium-green). For simplicity sake, light requirements can be divided into four levels:
Don't Forget Night Some Cattleyas initiate spikes in response to the longer, uninterrupted nights of winter. Therefore, all else being equal, they will only flower when they receive the adequate amount of night hours (although this can vary significantly between Cattleya species). Temperature Temperature plays an important role in flowering. Most standard Phalaenopsis for example, require cooler nights and days (60-75 °F) to initiate spikes. These cooler temps not only initiate the Phalaenopsis spike, but can also influence the number of flowers produced on that spike. This is why in our area of the south Phalaenopsis plants bloom primarily from winter to spring. This may differ if you are located in the north. On the other hand, many Dendrobiums like it hot, so they will typically flower from mid-summer to fall. We hope these tips bring about the ultimate reward of a re-blooming orchid. For more information visit EasyOrchidGrowing.com and be sure to watch our Orchid Care videos. Happy Blooming! 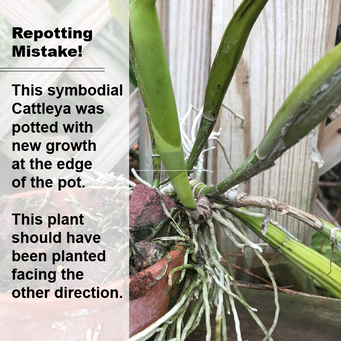 Tip #1 To Center or Not to Center? Knowing if your plant is monopodial or sympodial will help you determine where to place your plant in the new pot. Monopodials such as Phalaenopsis and Vandas grow upwards from the center of the plant whereas sympodial plants like Cattleyas, Oncidiums and Dendrobiums grow sideways. Plant your mono plants in the middle of your pot. For sympodials, determine the direction of your plant’s new growth and place the old growth at the back edge of your pot. This simple trick will prevent tipsy, one-sided plants and will allow your plant to grow bigger and fuller before you repot again. 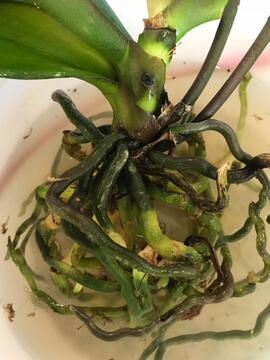 Tip #2 A Good Soaking Repotting can be stressful for your plants, so give them a boost with a good soak. If your plant is in healthy condition, mix a small amount of plant foodwith water according to the manufacturer’s instructions. Soak your bare-rooted orchid in this solution for approximately 15 minutes before you repot to help generate new root growth. If your orchid is sickly, you may want to try soaking your bare-rooted plant in a fungicide before repotting. This extra step will help give your sick plant a chance at survival. If you are repotting multiple plants, use fresh soaking baths between plants to avoid possible cross-contamination.
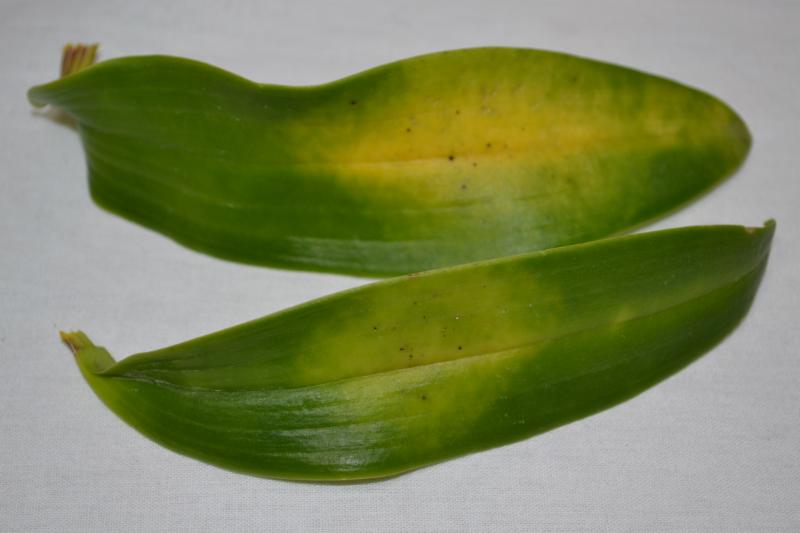
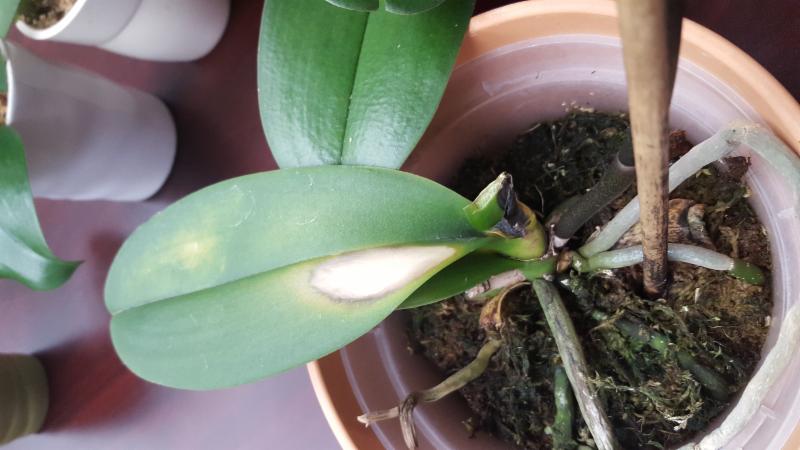
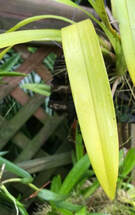 A few months back, we talked about orchid leaves turning purple which can commonly occur during the winter. Now that we are in the final weeks of summer with plenty of heat still lingering, let’s talk about yellow leaves. There are a number of reasons why orchid leaves turn yellow, some of which should cause concern while others are just part of your plant’s natural life cycle. Repotting Stress If you have recently repotted an otherwise healthy plant, yellowing leaves may be a sign of stress. It is completely natural for a repotted orchid to shed leaves. The first stage of this shedding process will be the yellowing of select leaves. There is nothing to worry about if the rest of the plant looks strong. 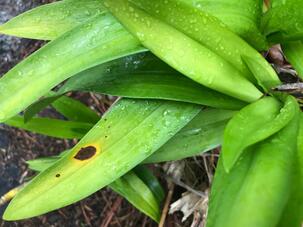 Too Much Sun If you grow your orchid outside, summer is the time when you need to take extra care to ensure that your plants aren’t getting burned. If the pseudobulbs and roots of your plant look healthy, but the you notice yellowing leaves, it’s likely that your orchids are simply getting too much sun. “Sunburn” will start on the highest point of the leaf. Leaves will turn from a nice healthy looking green to a lime-ish green then to yellow. If nothing is done to protect your plant, you will eventually find unsightly, round, papery spots that will permanently scar your plant.  Too Little Water or Too Much Water If your leaves are beginning to turn yellow and are also floppy, wrinkled and/or leathery it is likely that your plant needs more water. Water your plant thoroughly and allow the water to completely drain. On the flipside, overwatering can cause your plant to yellow. If your leaves look droopy, sickly and even slimy, you may be watering too much. Overwatering can kill a plant literally from the roots up. The roots of an overwatered plant will turn black and begin to rot before your leaves alert you that there is a problem. If you think you have overwatered your orchid, place your plant in a well ventilated location to allow more air flow to stave off bacterial or fungal infections. Wait until the potting media has dried out, then begin watering your plant again with less frequency than before. Natural Life Cycle If the lowest leaves of your otherwise healthy looking Phalaenopsis plant begin to yellow, don’t worry and do nothing. Your orchid is just going through a normal growth cycle to shed older leaves. We recommend that you avoid the temptation to cut the yellow leaf. Doing so could introduce fungus through the open cut wound. Your plant will seal the cut area if you allow the leaf to naturally die and fall off.  Bacteria, Fungus and Viruses Yellow leaves can often be a sign of a bacterial, fungal or viral infection. Check the underside of your leaves as well as your roots for signs of infection and treat with a Bactercide, Fungicide, or Virucide. Use as directed by the manufacturer. The key to happy, healthy orchids is to listen to your plants. We hope next time you spot a yellow leaf, you will have a better idea of what your orchid is trying to tell you.
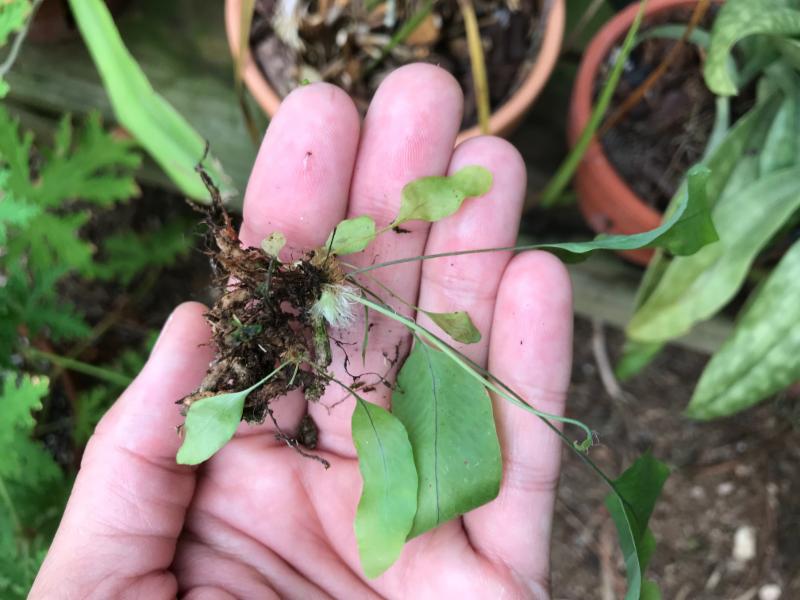
Happy Blooming from Better-Gro! 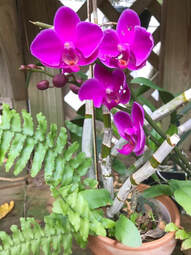 We love ferns but don't let them get mixed up with your orchids. Ferns are orchid foes not friends! This may sound counterintuitive in that ferns and orchids are both epiphytes. So, by definition, they derive their nutrition from air, rain and their surroundings. Neither harm their host plant, but when grown side-by-side, ferns and orchids can act like young siblings fighting for attention. If you want your orchids to thrive, it’s best to remove the foe before it can do any damage.
 These simple steps will help ensure that your collection remains an orchid collection rather than a fern collection.
Happy Blooming from Better-Gro! We’re often asked: (1) How do I know when to repot my orchid and (2) What is the best time to repot my orchid. Whether you are a first-time orchid owner or a long-time collector, follow these simple suggestions for repotting success.
In addition to structural damage, hurricanes can do a doozy on your landscape --- especially your orchids. We’ve assembled a few quick tips to help avoid further damage after a hurricane. 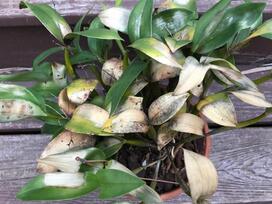 Too Much / Too Little Sunlight If a storm causes you to lose trees and branches that previously provided filtered light for your orchids, be sure to relocate your orchids to a shadier spot as soon as possible to avoid orchid sunburn. If you took your orchids indoors before the storm, make sure they are still receiving plenty of filtered sunlight. Often times, growers will move their orchids into a garage or bathroom to keep them protected but end up leaving them "in the dark" for too long while tending to other post-storm tasks. Saltwater Exposure If your orchids were exposed to saltwater associated with storm surge, it’s really important to flush your pots with fresh water. Saltwater can be very damaging to orchids. Salt, in a concentrated form, is a type of herbicide. The sooner you can clear the saltwater from your plants, the better your chances of saving them. Too Much / Too Little Water If your area received a lot of rain, check your outdoor pots to look to see if they are draining properly to avoid root rot. Drain holes may be clogged with debris and plant saucers may need to be drained. These efforts will also help to reduce breeding grounds for mosquitoes. If you relocated your orchids indoors before the storm, don't forget to keep them hydrated. The air in your home is less humid than outdoors. Try misting them often until you can move your plants outdoors again. 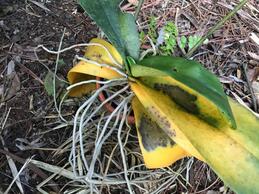 Stress
Hurricane stress isn’t just for humans, orchids can experience it, too. Watch for signs of fungus and bacteria. When a plant is weakened from changes in the environment, they are more susceptible. Treat at the first sign of fungus or bacteria and keep your sick orchids isolated from your healthy ones. Understanding the natural growing habitats of orchids helps us to understand where they should be happiest in our home. In nature, most orchids grow in tropical climates with lots of humidity, ventilation, and filtered light. Here are a few tips for growing orchids indoors and outdoors.  Finding the Perfect Indoor Spot Find a window that provides good filtered light throughout the entire day. In nature, most orchids grow in trees or within the landscape under trees and get filtered light from daylight until dark. Make sure the light your orchid receives is filtered with a sheer or screen. Don’t place a plant in a window with direct light as glass can actually intensify the light and cause burn. Orchids do well in bathrooms as they provide plenty of humidity. However, not all bathrooms have a window which is needed to ensure proper lighting. If you don't have a sunny window, grow lights are an alternative option. Also remember that humidity levels are important when growing indoors. Your air conditioner and heater are designed to remove humidity from the air. So you will need to provide additional humidity by misting your plants daily. Another alternative is to create a water reservoir with pebbles and a shallow dish filled with water to the top of the pebbles. By setting your orchids on top of the pebbles, your plants won't sit directly in the water - but humid air will rise around the plant to provide the humidity your plants need. 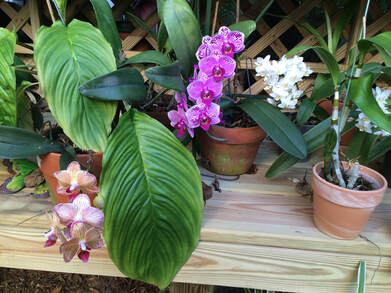 Outdoors with a view
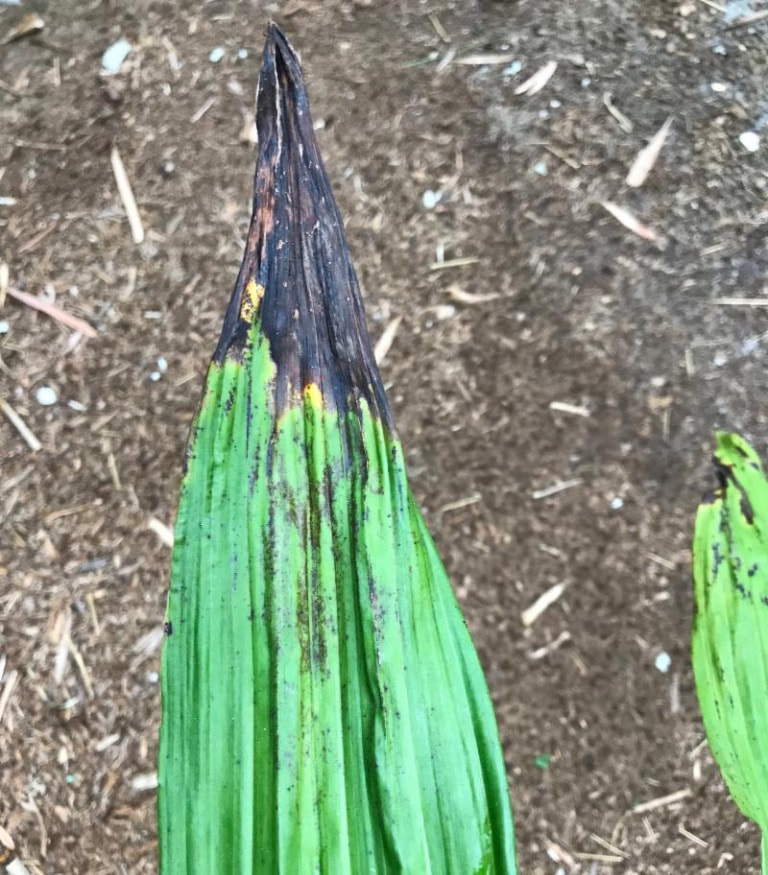
Back porches, lanais or pool areas provide a great growing environment for your orchids. Just remember to place your orchid where it won’t receive direct sunlight. Be sure to check the light levels throughout the day as shadows and light patterns may change from the morning to the afternoon. Typically, an outdoor environment provides natural humidity, but it’s still a good idea to keep an eye on the weather. During certain times of the year, the humidity can be very low and you may need to mist your plants. Also pay close attention to the type of orchids that you are growing. For example, vandas often require daily waterings. Another benefit to outdoor growing is natural ventilation. However, during certain times of the year, the wind may be stagnant. Most plant diseases and insects thrive in hot, stagnant areas. A simple box fan can provide the circulation needed to keep diseases and insects at bay. While the information above offers good rules of thumb (a green thumb!), keep in mind that different types of orchids have different requirements. To learn how to care for specific orchid varieties, visit our common orchid varieties page for more details. Happy Blooming! Summer is a time when fungal infections can quickly spread through your orchids. Fungi thrive in warm, humid conditions which coincidentally are the same conditions that most orchids need to survive. So, whether you are a greenhouse grower or your orchids are grown outside, you need to be vigilant about watching for the first signs of an infection. If left untreated, a fungus can kill your plants. But don’t worry, follow these instructions below to help detect, treat and prevent to bring your plants back to good health. Let’s talk about the most common types of fungi that may impact your orchids:
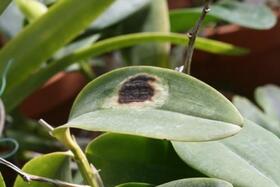
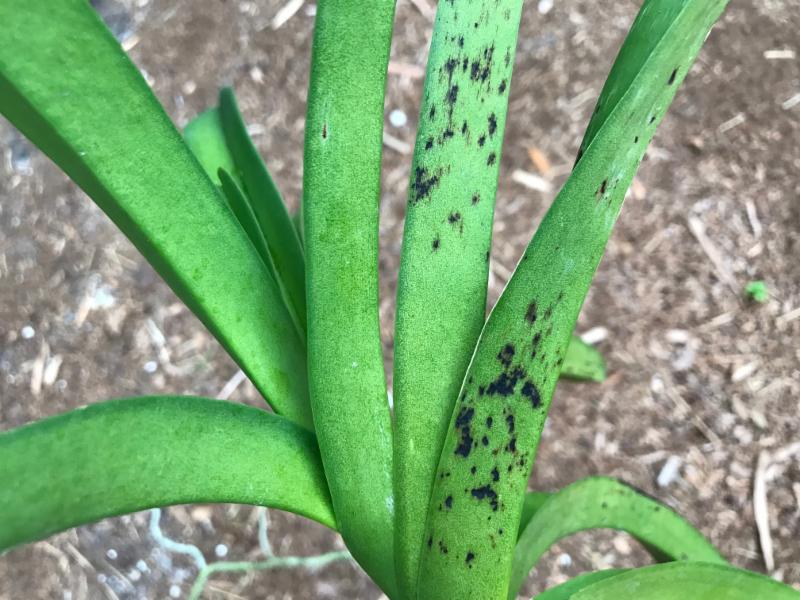
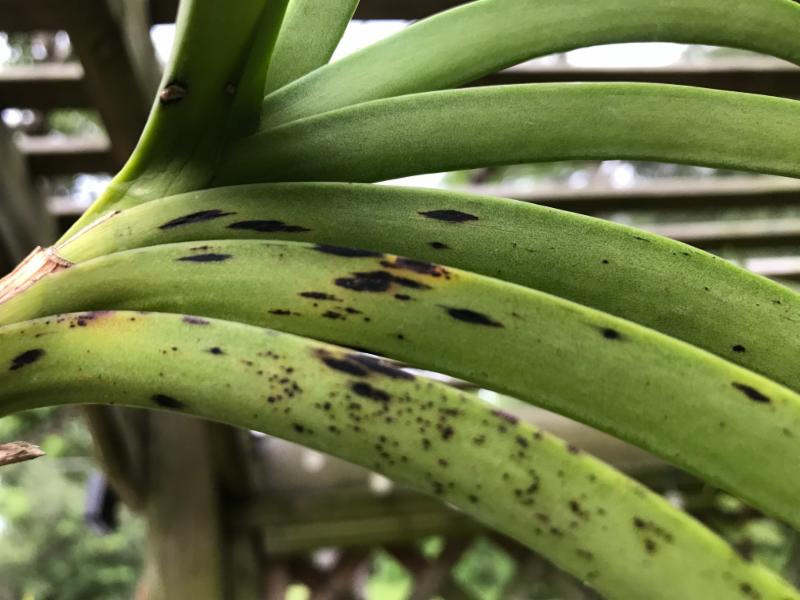
 Botrytis Signs Botrytis causes small brown spots on your flowers, ruining an otherwise beautiful flower. As the fungus spreads, you will notice more spots that are larger in size. Treatment Use a fungicide such as Physan 20, Daconil, Thiphanate Methyl according to the product directions. For a less toxic option, you may also use Hydrogen Peroxide in a spray bottle. You should know that spraying a fungicide will help control the fungal problem, but may also spot a flower or brown the edges. Prevention Improve the air circulation around your plants and remove dead plant materials (expired blooms, old pseudobulbs and dead leaves). Avoid watering flowers, and water early in the morning to allow plenty of time for excess water to be absorbed or evaporated. Also, monitor night temperatures and avoid dips below 60 degrees when possible.
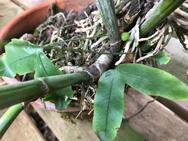
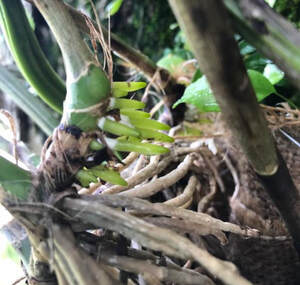
We hope you never find evidence of these fungal infections among your orchids. However, know that if you do catch it early, you can save your plant before it is too late. Remember to keep a clean growing environment, remove dead plant debris, allow for proper air circulation and water plants early in the morning. These simple suggestions will help keep the fungi away. Happy Blooming from Better-Gro! 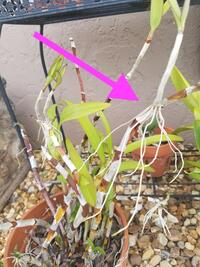 No, we aren’t keiki-ing or kidding! Nature really can provide two for the price of one. A keiki is an offshoot that forms on a mother plant. The word keiki is derived from the Hawaiian word for baby. So if you are lucky, from time to time, your orchid plants may produce a baby that can grow into a full-sized, flowering orchid. A keiki is just one way that orchids propagate and most commonly occur with dendrobiums, phalaenopsis and epidendrums. This particular type of propagation produces a new plant that will have the same characteristics as the parent plant. So flower color, size and fragrance will be identical. Where Do Keikis Grow? Dendrobium and epidendrum keikis typically develop along the cane. You will notice roots sprouting from the side or tip of the cane, and a new independent cane will form from these roots. On a phalaenopsis, keikis sprout from nodes along a healthy, green flower spike. 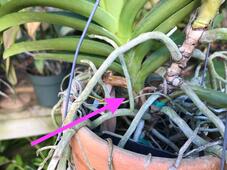 What Do You Do with Keikis? If you want to replicate the mother plant, allow the keiki to grow until the new plant develops a healthy root system and produces a new cane or multiple leaves. Be patient though, this growth process will take between six months to a year. If you prematurely remove the keiki, it will die. 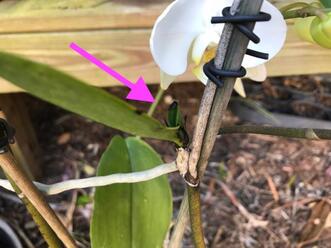 Removing a Keiki Simply use a sterilized cutting tool to remove the keiki taking care not to damage the new roots or the mother plant. Spray or swab the cut location with fungicide to protect the keiki and the mother plant from developing a fungus. If you don’t have fungicide readily available, sprinkle cinnamon from your spice cabinet on the wound. Cinnamon is a natural fungicide. For step-by-step instructions, refer to this American Orchid Society: Removing a Keiki Video. 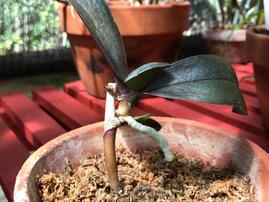 Caring for Your Keiki
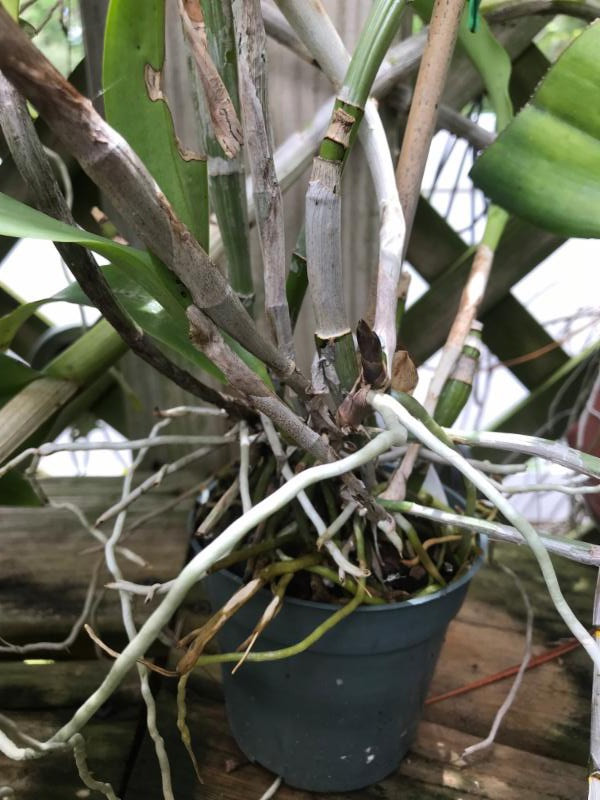
Plant the baby orchid in fresh potting medium. Stabilize the young plant with a stake and clip. Mist as needed and over time, your plant will grow into an adult-sized orchid. For tips on potting your baby orchid, view this American Orchid Society: Potting a Keiki Video. Happy Blooming with Better-Gro! There are several factors that lead to poor orchid growth. Correctly identifying the source of the problem is key to understanding how to treat it and avoid it in the future. In this post, we’ll discuss the most common issues that arise from improper watering and feeding levels.  An under-watered Phalaenopsis An under-watered Phalaenopsis Overwatering and Underwatering Not too much and not too little - but just the right amount of water will make your orchids very happy. But how do you know how much is just right? Over-watering is the most common problem associated with poorly performing orchids. Symptoms can look very similar to those of under-watered plants because it often rots the roots and therefore prevents them from taking up adequate amounts of water. The first thing to do is to examine the roots of the plant. If the roots are rotted (soft, black and soggy) then chances are the plant is being over-watered. If the potting media is fresh and the pot size is not too large, then you will need to cut back on the frequency of your watering. Also, because the rot is often associated with a bacteria or fungus, you may need to drench the plant or pot with a good fungicide or bactericide. Under-watered plants often exhibit limp or withered leaves and withered stems or bulbs. This happens because the plant is not getting enough water to keep the leaves, bulbs, or stems turgid. If the pot is not too small for the plant and the roots are in good health (white and firm), then this is easily remedied by watering the plant more frequently. Remember that Cattleyas and Dendrobiums like to dry between waterings. Once the potting media dries out, you should water the orchid promptly. Do not let the orchid stay dry for a prolonged period. Also, realize that larger pots tend to stay wet longer than smaller pots. One trick to learn is to lift the pot up when it is ready to be watered and note the weight of the pot. Now, water your plant thoroughly and let it drain for 5 minutes, then lift the pot up and again note the weight. The difference in pot weight is noticeable and, over time, this can be a quick and easy way to tell when your plant requires watering.
 It’s hard to believe, but orchids can get sunburned just as easily as humans. Many of us take precautions such as sunscreen, hats and special clothing to avoid the sun’s harmful rays, but what can you to do prevent burns to your plants this summer when the sun’s rays are at their strongest? Orchids need sunlight to grow; however, many varieties prefer indirect sunlight. Whether you keep your orchids indoors or outside, you need to take precautions against sunburn. Indoors Sunlight can be amplified by the windows in your home. Some direct sunlight is okay but prolonged exposure can result in sunspots. Try a north or east facing window to avoid the strength of late afternoon exposure. Additionally, be sure that the leaves of your orchid plant are not directly touching your windows. Outdoors The pattern of the sun changes throughout the year, so areas that may be shaded in winter may be in full sun during the summer. Sun and shade also change seasonally due to fallen leaves or routine tree and shrub pruning.
 Dtps. I-Hsin Song Dtps. I-Hsin Song Phalaenopsis orchids are beautiful and prolific. If left alone, each spike produces five to 10 blooms at a time, and each flower can last up to three months. With a little care, however, you can coax even more flowers out of a Phal. Here’s how you can enjoy almost never-ending blooms on a Phalaenopsis. Check Your Phalaenopsis After Blooming Before trying to entice a Phalaenopsis spike to produce more blooms, you need to check the plant and the spike’s health. First, only healthy, green spikes should be coaxed into flowering a second time. If there is any yellowing on the spike, it’s drying out and will eventually die. It should be cut back to the base, even if just the tip is yellowing, to let the plant focus on developing its root system and growing leaves. The orchid should flower the following season, within 12 months, and its flowers will likely be larger because the roots and leaves will be more developed. Second, only spikes that don’t have any more buds on them should be trimmed. Occasionally, a spike will cease growing and flower, only to grow again and produce more buds. If there are more buds on the tip of the spike, leave it alone until they finished flowering. 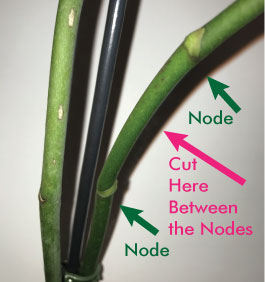 Cutting Back a Phalaenopsis Spike As long as a spike is healthy and has no more flowers, you can try to coax more flowers out of it by trimming it back. Instead of cutting it all the way back to the leaves, leave two nodes on the spike. Cut it about ½ inch above the second of the two nodes. (Nodes are the little bumps on the stem.) Most of the time, if the plant is healthy, and conditions are right, one of the two nodes will produce a side shoot. This side shoot will begin flowering within eight to 12 weeks. Although these flowers may not be quite as large as the initial group of blooms, they will still be beautiful and last for a long time. In some cases, the node will form a keiki, which is a little plant. Keikis must remain attached to the mother plant for two years, at which point they will begin to develop roots and can be planted on their own. During these two years, however, a keiki will send up spikes of its own, which will produce flowers. Timing Your Trimmings As long as a Phalaenopsis is healthy, you should be able to continue cutting its spike back to produce more side shoots and additional flowers. If a Phal has more than one spike, timing your trimmings can produce virtually never-ending blooms, because flowers can last for up to three months, and side shoots will produce blooms within two to three months. Keep in mind that when you keep flowering on the same spike, it will slow down the plant’s growth. It takes a lot of energy and nutrients for an orchid to grow a spike and flower. Just like people need a nap after exerting a lot of energy, your orchid will need a rest period after flowering to stay healthy. So, be sure to strike a balance between continual growth and rest periods. 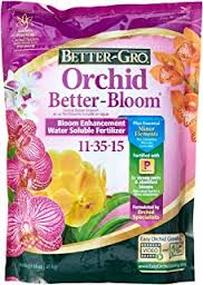 Watering and Feeding Your Phalaenopsis
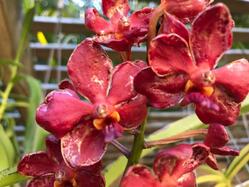
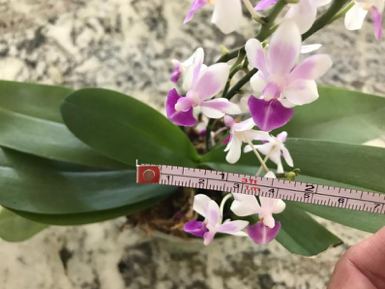
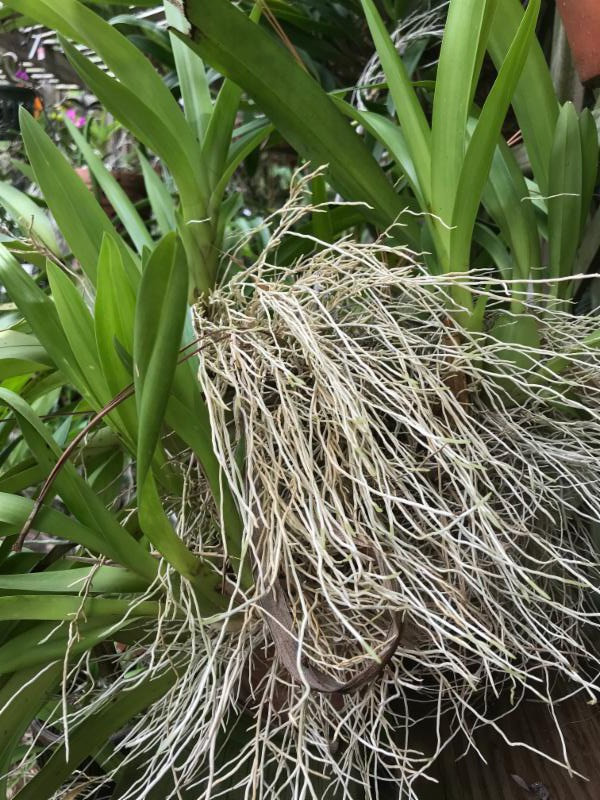
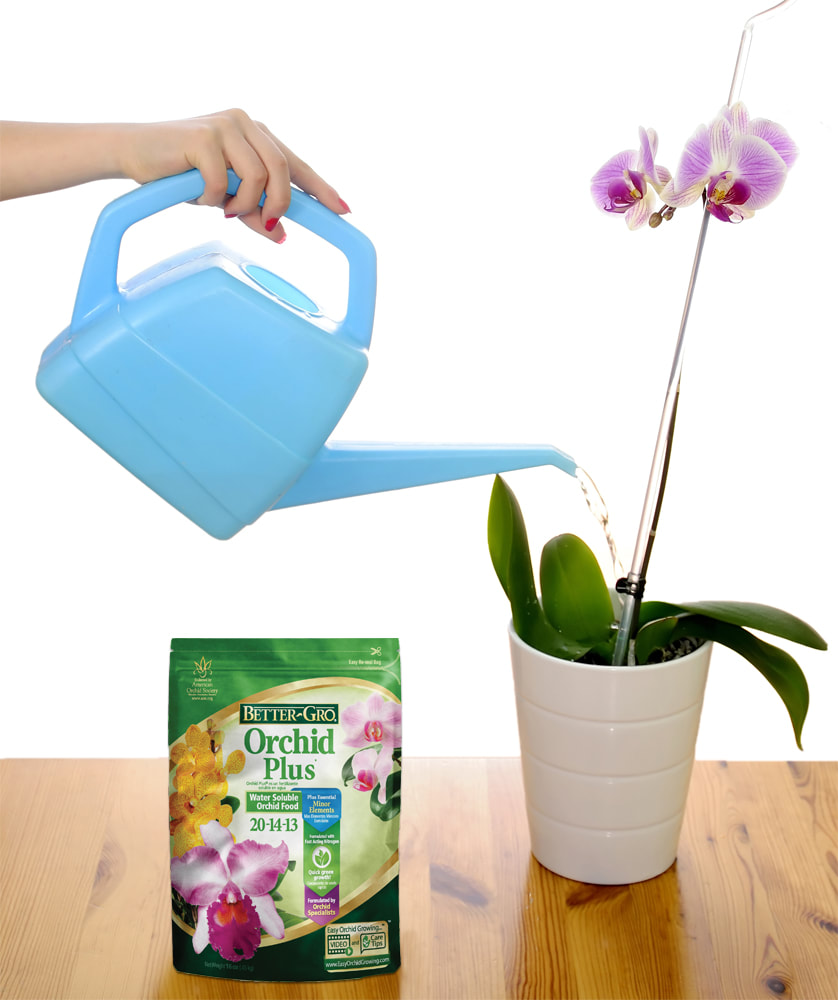
Between blooms, you should continue to water and feed your Phalaenopsis as normal. Its soil should be kept moist, although not soggy, and it should be fed twice a month with an orchid-specific fertilizer. If you’re trying to coax more blooms out of your Phal, alternating feedings between Orchid Plus® Plant Food and Orchid Better Bloom Plant Food will help maintain a healthy plant and produce beautiful blooms. Happy Blooming from Better-Gro! 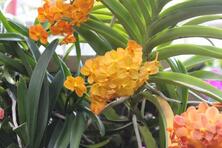 It's likely that you have stopped to admire a Vanda at your local garden center or even seen them growing in a greenhouse or your neighborhood. These eye-catching orchids certainly attract attention. Less common than Phalaenopsis and Cattleya orchids, Vandas require slightly different care than other orchid varieties, but they are well worth the effort! 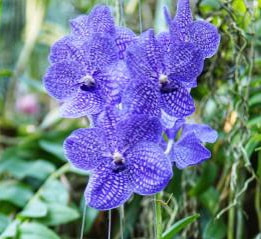 Blossoms Vandas are showy, long-lasting, frequent bloomers. They are very rewarding to grow and often times fragrant. Prized for their intense colors, they are commonly available in hot pink, orange, red and purple. The Vanda genus also includes a species with vibrant blue flowers called Vanda coerulea or the Blue Orchid (shown right). Unlike many other orchids that bloom just once a year, healthy Vandas can bloom throughout the year. 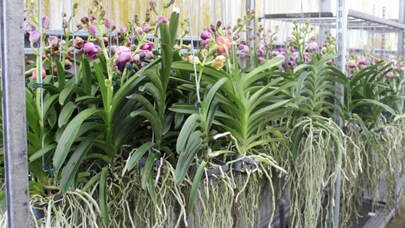 Leaves and Types Vandas are different from Cattleyas and Oncidiums in that they don’t have pseudobulbs. Water is retained in the plants' leaves which is why they need to be watered more frequently. Vandas come in three types and are easily distinguishable by looking at the plant's leaves.
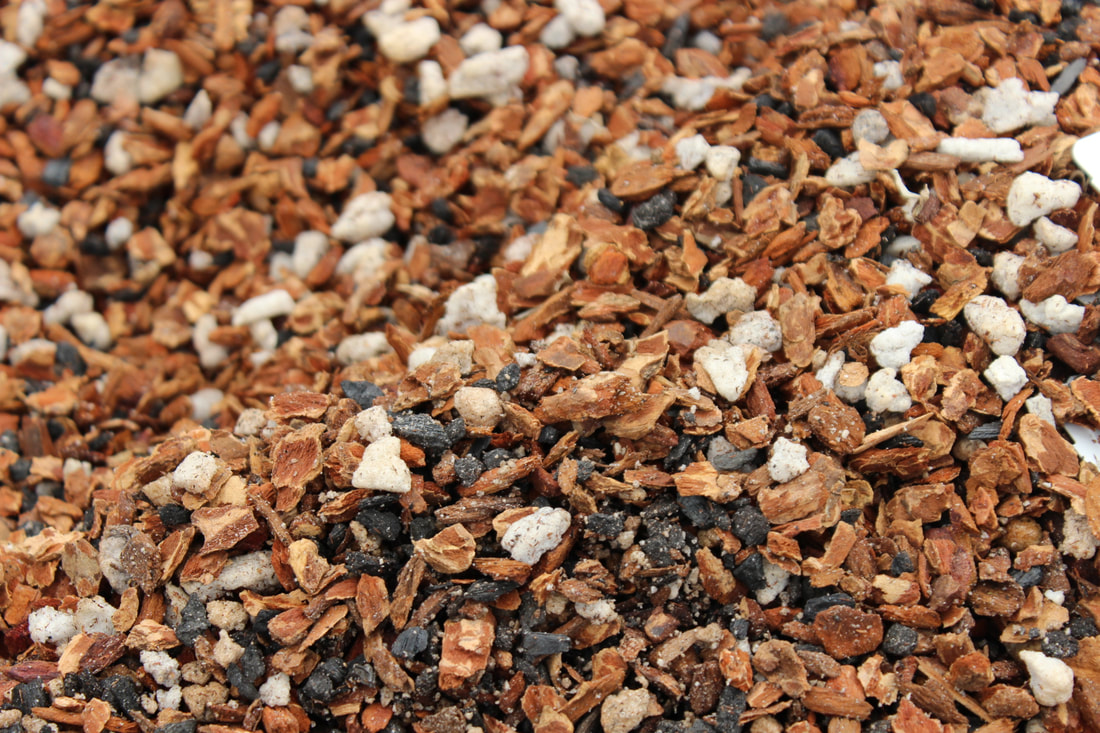
 Vanda Origins Their natural habitat ranges from India and the Himalayas to China, the Philippines and New Guinea. A few species are found in the Western Pacific Islands and Queensland, Australia. Most species in the Vanda genus are epiphytes, meaning they grow on other plants without harming the host plant. By clinging to trees, Vandas have access to more sunlight versus growing on the forest floor, while still being shielded from direct sunlight by the tree canopy. In addition to growing in trees, some Vandas are lithophytic which means the grow on rocks, and some are terrestrial (grow on the ground).  Plant Size Vandas come in many sizes. Some are tiny and can fit in the palm of your hand whereas others can grow up to 6 feet tall. Individual flowers range in size from less than an inch to four inches. They grow in clusters with up to 15 flowers per stem. Vandas are easily recognizable from other orchids due to their long, rambling roots that enable the plant to cling to trees. Often times, you will find Vanda roots growing two to four feet below the plant. Vandas are unique in that they do not grow in traditional orchid plant media like fir bark and charcoal.  Caring for Vandas If you are interested in learning more about the ideal conditions for growing Vandas, please visit our Vanda Care Instructions on the Better-Gro website. There you will find recommendations for temperature, light, watering, feeding and humidity. We hope you will consider bringing home your own Vanda in the future. Please send us your photos on Facebook, Instagram and Twitter with the hashtag #BetterGroBlooms. Happy Blooming from Better-Gro!
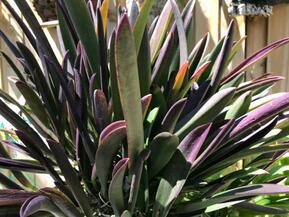 You’ve heard of the winter blues but what is making your orchids turn purple? “The purple coloration you see on the underside and sometimes topside of orchid leaves is a winter phenomenon,” says Robert Palmer, head grower at Better-Gro. “But don’t worry, this is completely natural. Many orchids that are grown outdoors either in pots or on trees go through this annual cycle.” Just as autumn leaves turn red, orange and purple in the fall, some orchids go through a similar change although they don’t shed their leaves. Purple leaves occur for several reasons. 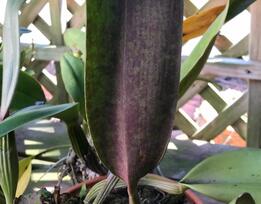 Winter Dormancy As you may remember from school, chlorophyll is what allows a plant to absorb light and produce energy. Purple leaves are a natural sign that your orchids have cut back on producing chlorophyll during a time of winter dormancy. Essentially, the orchid is saving energy for the spring time. In contrast, orchids that are dark green in winter are likely continuing to expend energy producing excess chlorophyll. What’s wrong with healthy dark green leaves? Nothing, however, it’s likely that your plant is focusing on its leaves rather than reserving energy to produce spring blossoms. 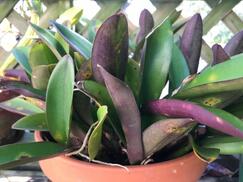 Excess Light Purple leaves can be an indication that your plant is receiving too much light. This light exposure is common with orchids grown outdoors due to reduced winter tree canopies. As long as your orchid is not getting burned, the excess light and purple leaves are not harmful. Cold Exposure Orchids that were exposed to winter cold spells will exhibit purple leaves if they are magnesium deficient. 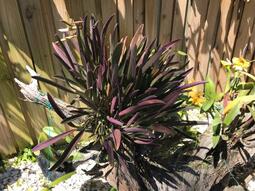 How Can You Reduce the Purple Coloration?
Although purple leaves are not harmful, you can give your orchids a leg up on spring and boost the flower-initiation process with Epsom salts. Simply mix 1 gallon of water with ½ to 1 Tablespoon of Epsom salts. Generously spray your plants once a month. This inexpensive treatment can be applied year-round and will help reduce purple leaves. Happy Blooming from Better-Gro!
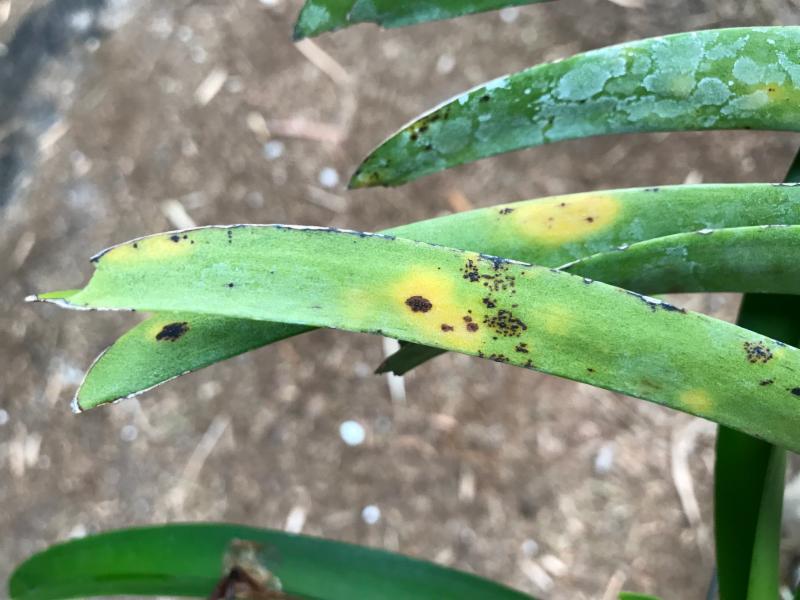
 Mini Care These plants have the same needs as their larger counterparts: humidity, light, and warm temperatures. Water: Because of the smaller pot size, often times they will require less water than a traditional phal. We suggest that you water once weekly, making sure the pot drains entirely through the drainage holes. If you keep the plant indoors, you may need to lightly mist your mini to add humidity. Or, you can place the orchid pot in a container of water and pebbles making sure the pot is sitting on top of the rocks and not directly in the water. Temperature: Your orchid will enjoy the same temperatures that you do in your home. Keep your plant in a location that ranges between 65 and 80° F. Light: Place your mini in a bright location but avoid direct sunlight which may burn the leaves. Typically, southern or eastern facing windows are best. Plant Food: Use a water soluble, balanced plant food designed for orchids. Follow the care instructions on the label. Big Bonus Like their larger-sized cousins, mini phals will often bloom two to three times a year. We hope you enjoyed this mini tutorial. 😍 Happy Blooming from Better-Gro  Phalaenopsis in our green house Phalaenopsis in our green house It is such a joy to bring home a new orchid. They brighten up your home and garden, and some varieties stay in bloom for up to three months. Whether you have just a few plants or an extensive collection, here are several steps you should take when bringing home a new orchid from the garden center, grocery store or local orchid show. Check the Moisture Level of the Potting Media Stores do their best to properly care for plants, but under or over watering does occur. If the plant feels heavy from water and the potting media is cool to the touch, wait a few days before watering to allow the excess moisture to be absorbed. If the potting media is dry and/or the leaves look limp, give the plant a good watering, but make sure the water flows through and exits the pot. 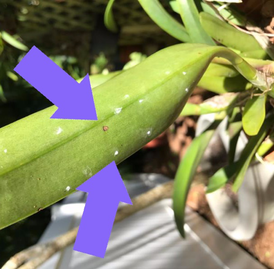 Scale on orchid leaf Scale on orchid leaf Look for Bugs Your new orchid may have left the greenhouse free from bugs, but once exposed to other plants in the store, some critters may decide to move to a new host plant. In addition to inspecting the plant in the store, it is a good idea to do an additional check at home. Some bugs are almost impossible to see with the naked eye, so a simple light rinse of the leaves with water will likely wash away the bugs. If you do happen to notice a small spot of scale or mealy bugs, you can eliminate these pests by wiping the leaves with a cotton ball soaked in 70% isopropyl alcohol. Quarantine If you have a collection of orchids, it’s best to keep your new orchid in a different location for at least a week. This separation will allow you to look for bugs, fungus or bacteria on the new plant before exposing your existing healthy plants to potential issues. 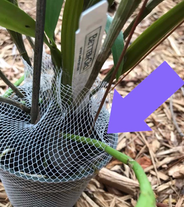 New growth can get damaged by netting New growth can get damaged by netting Remove Netting and Plastic Wraps Growers will often use netting to prevent the potting media from spilling out. Be sure to remove the net or tape once you have brought your plant home to avoid new growth from getting trapped and damaged. Additionally, if your plant has a thin colorful plastic or foil wrap surrounding the pot, it is best to remove these wraps. Orchids are epiphytic and their roots need air flow. These wraps limit that flow and trap water which could cause the plant to rot. If you want to use a decorative pot while your plant is in bloom, simply place the orchid's plastic or terracotta pot inside your preferred pot, making sure the water can drain. 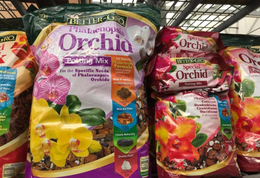 Repot After the Blooms Have Dropped
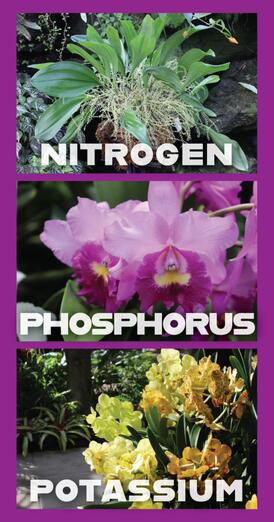
Sphagnum moss is used by many growers to keep plants from drying out during shipping and while in the store. After your orchid has finished blooming, we recommend repotting your orchid in fresh potting mix. If you repot while your orchid is in bloom, the blossoms may prematurely drop. We hope these simple suggestions will help you the next time you bring home your next orchid. Happy Blooming from Better-Gro! If buying plant food has you saying IDK (short for I Don’t Know) about NPK, don’t worry! You don’t need to be a chemist, biologist or professional grower. We’ve got the answers to help you select the right plant food. So, What is NPK? NPK is an abbreviation for Nitrogen (N), Phosphorus (P) and Potassium (K). Remember the abbreviations on the Periodic Table from high school chemistry class? These nutrients when applied at the right time in the correct amount can help you grow healthier, happier plants. Behind the Numbers Not all fertilizers say “NPK” on the packaging, but you will consistently find three numbers that correspond to the percentage of Nitrogen, Phosphorus and Potassium content in the fertilizer. For example, you may see 10-10-10 on the packaging label which indicates the plant food contains 10% of each of these primary nutrients.
|


Resources
|
Company |
|